Fedora: Anaconda 3分クッキング

この記事はLinux Advent Calendar 2015 - Qiitaの第一日目の記事です。

anacondaをハックする場合、ビルド周りで参考になるのは下記の2ページです。

Buildingのページは必要なパッケージのインストールから始まって、rpmの作成の解説です。 Updatesはというと、インストーラに含まれているanacondaにパッチを当てるためのイメージを作成となります。Fedoraインストーラ起動時にカーネルコマンドラインを編集できるのですが、そこでanacondaのための引数を設定することができ、この引数にアップデートイメージのURLを渡すとアップデートイメージをダウンロードして展開し、パッチが当たったanacondaでインストールができるようになります。 anacondaをハックする場合、手軽なのはアップデートイメージを作る方法です。これならインストーラそのものを作りなおす必要もないので簡単です。

では、やってみましょう。 最初にソースを取得します。これはAnacondaのページにgithubリポジトリが書かれているのでそこからcloneしましょう。

masami@kerntest:~ git clone https://github.com/rhinstaller/anaconda.git

次にビルドに必要なパッケージをインストールします。必要なのはlibtoolパッケージと、

masami@kerntest:~/anaconda (master)$ sudo dnf install libtool -y

その他諸々です。BuildingのページのようにBuildRequiresでパッケージを検索するとs390用のパッケージがなくてインストールできないので、これだけ省いてます。

masami@kerntest:~/anaconda (master)$ grep ^BuildRequires: anaconda.spec.in | awk '{print $2}' | grep -v s390 | xargs sudo dnf install -y

必要なものがインストールできたら対象のブランチを決めて、そこを弄りましょうということで、ここではfedora 23のブランチを取得します。

masami@kerntest:~/anaconda (master)$ git branch -r
~略~
origin/f23-branch
~略~
masami@kerntest:~/anaconda (master)$ git checkout -b f23 origin/f23-branch
Branch f23 set up to track remote branch f23-branch from origin.
Switched to a new branch 'f23'

そして、autogen.shを実行してconfigureスクリプト等を生成します。anacondaのソースパッケージを使う場合はこの手順は不要かと思いますが、今回はgitリポジトリからソースを取得したのでこの手順が必要です。

masami@kerntest:~/anaconda (f23)$ ./autogen.sh

終わったらconfigureスクリプトを実行します。autogen.shやconfigureの実行は必要なパッケージが入っていれば問題なく終わると思います。

masami@kerntest:~/anaconda (f23)$ ./configure

ここまでくればあとは適当に弄って、最後にアップデートのイメージを作るだけです。 今回はデフォルトの言語を変えてみます。

変えたのはこんなところです。

masami@kerntest:~/anaconda (f23)$ git commit -m "Change default lang from English to Japanese"
[f23 396a846] Change default lang from English to Japanese
 1 file changed, 2 insertions(+), 2 deletions(-)
masami@kerntest:~/anaconda (f23)$ git diff HEAD^
diff --git a/pyanaconda/constants.py b/pyanaconda/constants.py
index df1a171..435ea3a 100644
--- a/pyanaconda/constants.py
+++ b/pyanaconda/constants.py
@@ -61,11 +61,11 @@ INSTALL_TREE = MOUNT_DIR + "/source"
 BASE_REPO_NAME = "anaconda"

 # NOTE: this should be LANG_TERRITORY.CODESET, e.g. en_US.UTF-8
-DEFAULT_LANG = "en_US.UTF-8"
+DEFAULT_LANG = "ja_JP.UTF-8"

 DEFAULT_VC_FONT = "eurlatgr"

-DEFAULT_KEYBOARD = "us"
+DEFAULT_KEYBOARD = "jp106"

 DRACUT_SHUTDOWN_EJECT = "/run/initramfs/usr/lib/dracut/hooks/shutdown/99anaconda-eject.sh"

変更したらアップデートのイメージを作りましょう。

masami@kerntest:~/anaconda (f23)$ make updates
Using tag: anaconda-23.19.10-1
BUILDDIR /home/masami/anaconda
Including pyanaconda/constants.py
Including pyanaconda/packaging/dnfpayload.py
88 blocks
<stdin> to <stdout>
updates.img ready

これで完了です。では、実際にパッチを適用してみます。 Fedora23のデスクトップ版をqemuでさくっと起動します。

masami@saga:~/tmp$ qemu-system-x86_64 --enable-kvm -m 4096 -cdrom ../Fedora-Live-Workstation-x86_64-23-10.iso -boot d

ブート画面が出たらtabキーを押してコマンドラインの編集モードに入り、updates=http://10.0.2.2:8000/updates.img を最後に追加して、アップデートイメージのURLを教えてあげます。 f:id:masami256:20151128100959p:plain

起動したらInstall to Hard Driveのほうを選んでインストーラを起動します。

f:id:masami256:20151128101253p:plain

この前後位でupdates.imgを取りにきます。

masami@saga:~/tmp$ python3 -m http.server 8000
Serving HTTP on 0.0.0.0 port 8000 ...
127.0.0.1 - - [28/Nov/2015 09:58:19] "GET /updates.img HTTP/1.1" 200 -

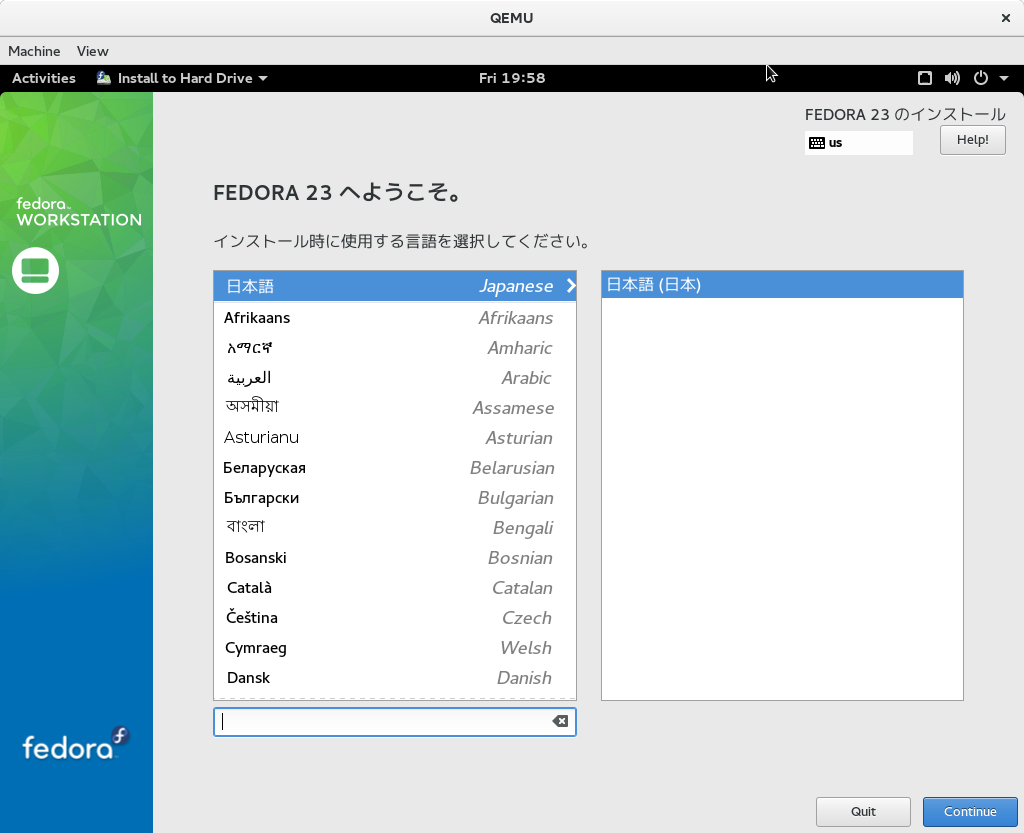
インストーラが起動すると言語が日本語で表示されていて、パッチが適用されているのがわかります( ´∀`)bグッ!
f:id:masami256:20151128101426p:plain

ちなみに、キーボードが変わっていないのはlocaleを見ているからっぽいです。

anaconda/pyanaconda/ui/gui/spokes/welcome.pyを見るとlocaleによってlayoutを設定しているので、ここが効いていそうです。Gnome3のメニューは英語ですし。

        layouts = localization.get_locale_keyboards(locale)
        if layouts:
            # take the first locale (with highest rank) from the list and
            # store it normalized
            new_layouts = [keyboard.normalize_layout_variant(layouts[0])]
            if not langtable.supports_ascii(layouts[0]):
                # does not support typing ASCII chars, append the default layout
                new_layouts.append(DEFAULT_KEYBOARD)
        else:
            log.error("Failed to get layout for chosen locale '%s'", locale)
            new_layouts = [DEFAULT_KEYBOARD]

大まかなディレクトリ構造の説明をしておくと。anacondaは基本的にPythonで書かれたプログラムなのでpyanaconda/以下のファイルを参照するのがメインになると思います。 pyanaconda/直下にあるpythonファイルがUI部分を除いた実際の機能になります。uiに関してはGUI(ライブCD)・TUI(ネットワークインストール、サーバ版)の2個があります。 そして、実際の画面に関するところはui/gui/spokes、ui/tui/spokesにあります。画面構成に関しては.gladeファイルに記述されています。

installclasses/はインストーラのメインクラス的なものでfedorarhelのクラスがあります。これらのクラスはBaseInstallClassを継承しています。

こんな感じで、anacondaに対してアップデートが簡単に作れます(∩´∀`)∩ワーイ 基本的にanacondaは途中でバグに当たるとpythonのデバッガに落ちます。なのでデバッガに落ちたところでデバッグをして原因を調べて、fixやデバッグメッセージの追加をしてアップデートイメージの作成し、再度確認なんてこともできますね。バグにあたっても自分でデバッグしてパッチを適用して自分で解決できるというのが割と簡単にできる親切設計ですネ!

パーフェクトPython (PERFECT SERIES 5)

パーフェクトPython (PERFECT SERIES 5)

fedora カーネルパッケージのバージョンの付け方の謎

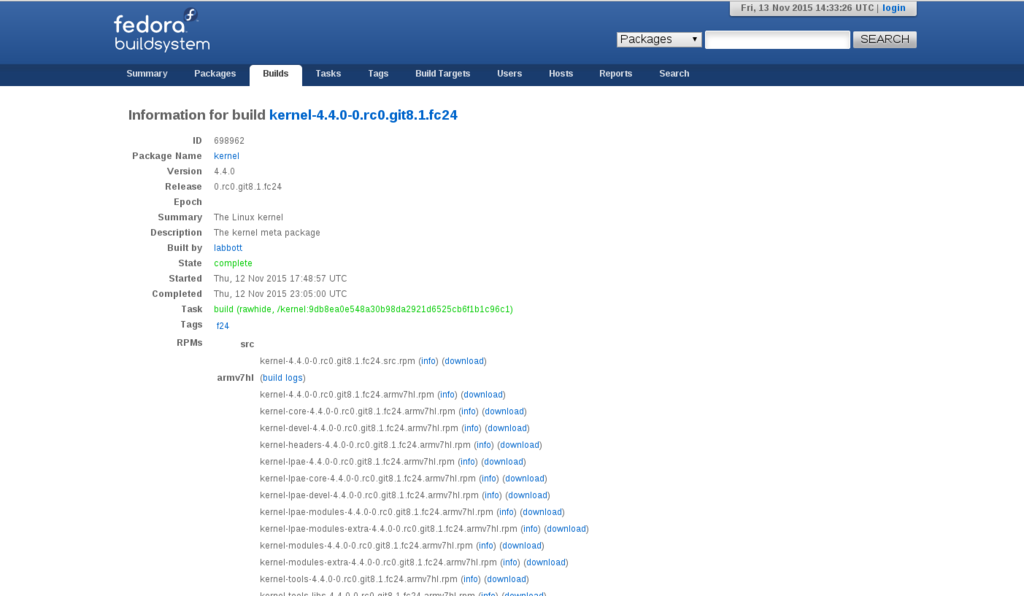
このタイトルだと謎とは何ぞや?となる人が多いと思います・・・ どういうことかというと、2015/11/12の時点ではカーネル 4.4のマージウィンドウが開いている段階で、カーネルMakefileに書かれているバージョンは4.3です。 これを書いている時の最新のコミットだとこうなってます。

VERSION = 4
PATCHLEVEL = 3
SUBLEVEL = 0
EXTRAVERSION =
NAME = Blurry Fish Butt

で、fedora rawhide(今の時点ではfedora 24)のカーネルパッケージは4.4系のバージョン番号になっています。 f:id:masami256:20151113234456p:plain

そして、タイトルの「fedora rawhideのカーネルパッケージのバージョンの付け方の謎」になるわけです。

この謎を調べるためにはkernel.specを見る必要があります。 まずは、現時点でのsoucesファイルを見るとベースは4.3系なことがわかります。

58b35794eee3b6d52ce7be39357801e7  linux-4.3.tar.xz
7c516c9528b9f9aac0136944b0200b7e  perf-man-4.3.tar.gz
7969fc8a820c526832269b78dbef685b  patch-4.3-git8.xz

次にkernel.specを見ましょう。

最初にリリース版のカーネルかどうかの変数があります。4.4系はまだリリース版のカーネルではないので0になってます。

# For a stable, released kernel, released_kernel should be 1. For rawhide
# and/or a kernel built from an rc or git snapshot, released_kernel should
# be 0.
%global released_kernel 0

ここから下に進んでいくと、リリース版じゃないカーネルの場合のバージョン番号をセットする箇所が見つかります。

## The not-released-kernel case ##
%else
# The next upstream release sublevel (base_sublevel+1)
%define upstream_sublevel %(echo $((%{base_sublevel} + 1)))
# The rc snapshot level
%define rcrev 0
# The git snapshot level
%define gitrev 8
# Set rpm version accordingly
%define rpmversion 4.%{upstream_sublevel}.0
%endif

まず、一番最後のところですが、ここで4.4.0のようなバージョンが作られますね。なので、upstream_sublevelが4.xのxの部分ですね。

%define rpmversion 4.%{upstream_sublevel}.0

ここは下のようになっていて、base_sublevelの値+1のバージョンが設定されるようです。

%define upstream_sublevel %(echo $((%{base_sublevel} + 1)))

base_sublevelは上記の設定箇所より前で設定されてます。ここは機械的に設定されるのではなくて、必要に応じて書き換えてる感じですね。 3.1のrc7だとベースになるのは3.0ということなので、4.4のrcということはbase_sublevelは4.3の3ということっぽいです。

# base_sublevel is the kernel version we're starting with and patching
# on top of -- for example, 3.1-rc7-git1 starts with a 3.0 base,
# which yields a base_sublevel of 0.
%define base_sublevel 3

というわけで、upstream_sublevelはbase_sublevelに1を足しているので4になります。

%define upstream_sublevel %(echo $((%{base_sublevel} + 1)))

そして、ここで4.4.0という番号が作られるということです。

%define rpmversion 4.%{upstream_sublevel}.0

最後にgitのリビジョンやrcの番号は

# non-released_kernel
%if 0%{?rcrev}
%define rctag .rc%rcrev
%else
%define rctag .rc0
%endif
%if 0%{?gitrev}
%define gittag .git%gitrev
%else
%define gittag .git0
%endif
%define pkg_release 0%{?rctag}%{?gittag}.%{fedora_build}%{?buildid}%{?dist}

2015/11/12時点ではnon-releasedカーネルなのでrcrevには0が設定されているのでrctagは.rc0になります。 ↓の部分ですね。

# The rc snapshot level
%define rcrev 0

gitのリビジョンは下のように8が設定されているので、gittagは.git8というふうになります。

# The git snapshot level
%define gitrev 8

それで最終的に細かいバージョン番号を↓のように設定しています。

%define pkg_release 0%{?rctag}%{?gittag}.%{fedora_build}%{?buildid}%{?dist}

buildidはspecファイル内で再定義しない場合は1からインクリメントされていってると思います。distは現時点での最新のfc24です。 そうすると0.rc0.git8.1.fc24となります。

最後にrpmversionとpkg_releaseを合わせるとkernel-4.4.0-0.rc0.git8.1.fc24となるわけです。

プロのための Linuxシステム・10年効く技術 (Software Design plus)

プロのための Linuxシステム・10年効く技術 (Software Design plus)

Fedora 23でFedora Cloudイメージをvagrant-libvirtで動かすメモ

Vagrantlibvirt使えるならそっちのほうが便利だよなーというところで、まずは軽くお試しを。 Fedoralibvirt providerのインストールに関しては最近公開されたFedora Developer PotalのVagrant with libvirt support installationにあるとおりで、dnfコマンドでvagrant-libvirtパッケージをインストールすれば依存関係諸々含めてインストールできます。

sudo dnf install vagrant-libvirt

このままでも問題なく動くのですが、何かしらの操作をするときに毎回パスワードを聞かれます。これが面倒な場合は、先のページにあるvagrant-libvirt-docパッケージをインストールして.ruleファイルをコピーして〜というところを実行します。

Vagrantのboxイメージはどうしよかなというところですが、まあ、Fedora23のイメージで行くかーってことで、Fedora Cloudのページから適当なlibvirt/kvmのイメージをダウンロードします。ここではBase Imagesのタブにあるlibvirt/KVM イメージをダウンロードしました。

ここから先は普通のVagrantの使い方と一緒ですね。Fedora 22での場合のやり方がfedora MagazineのRunning Vagrant on Fedora 22という記事にあります。

最初にvagrant initして、

masami@saga:~/codes/fedora-vagrant$ vagrant init
A `Vagrantfile` has been placed in this directory. You are now
ready to `vagrant up` your first virtual environment! Please read
the comments in the Vagrantfile as well as documentation on
`vagrantup.com` for more information on using Vagrant.
masami@saga:~/codes/fedora-vagrant$

Vagrantfileのconfig.vm.boxで適当な名前を設定し、

  # Every Vagrant development environment requires a box. You can search for
 14   # boxes at https://atlas.hashicorp.com/search.
 15   config.vm.box = "fedora23"
 16

vagrant box addでboxファイルをadd。

masami@saga:~/codes/fedora-vagrant$ vagrant box add Fedora-Cloud-Base-Vagrant-23-20151030.x86_64.vagrant-libvirt.box --name fedora23
==> box: Box file was not detected as metadata. Adding it directly...
==> box: Adding box 'fedora23' (v0) for provider:
    box: Unpacking necessary files from: file:///home/masami/codes/fedora-vagrant/Fedora-Cloud-Base-Vagrant-23-20151030.x86_64.vagrant-libvirt.box
==> box: Successfully added box 'fedora23' (v0) for 'libvirt'!
masami@saga:~/codes/fedora-vagrant$

vagrant box listで確認。

masami@saga:~/codes/fedora-vagrant$ vagrant box list
fedora23 (libvirt, 0)

そして、vagrant up。

masami@saga:~/codes/fedora-vagrant$ vagrant up
Bringing machine 'default' up with 'libvirt' provider...
==> default: Creating image (snapshot of base box volume).
==> default: Creating domain with the following settings...
==> default:  -- Name:              fedora-vagrant_default
==> default:  -- Domain type:       kvm
==> default:  -- Cpus:              1
==> default:  -- Memory:            512M
==> default:  -- Base box:          fedora23
==> default:  -- Storage pool:      default
==> default:  -- Image:             /var/lib/libvirt/images/fedora-vagrant_default.img
==> default:  -- Volume Cache:      default
==> default:  -- Kernel:
==> default:  -- Initrd:
==> default:  -- Graphics Type:     vnc
==> default:  -- Graphics Port:     5900
==> default:  -- Graphics IP:       127.0.0.1
==> default:  -- Graphics Password: Not defined
==> default:  -- Video Type:        cirrus
==> default:  -- Video VRAM:        9216
==> default:  -- Keymap:            en-us
==> default:  -- Command line :
==> default: Creating shared folders metadata...
==> default: Starting domain.
==> default: Waiting for domain to get an IP address...
==> default: Waiting for SSH to become available...
    default:
    default: Vagrant insecure key detected. Vagrant will automatically replace
    default: this with a newly generated keypair for better security.
    default:
    default: Inserting generated public key within guest...
    default: Removing insecure key from the guest if it's present...
    default: Key inserted! Disconnecting and reconnecting using new SSH key...
==> default: Configuring and enabling network interfaces...
==> default: Rsyncing folder: /home/masami/codes/fedora-vagrant/ => /vagrant
masami@saga:~/codes/fedora-vagrant$

vagrant sshでログインできることを確認。

masami@saga:~/codes/fedora-vagrant$ vagrant ssh
[vagrant@localhost ~]$ uname -a
Linux localhost 4.2.3-300.fc23.x86_64 #1 SMP Mon Oct 5 15:42:54 UTC 2015 x86_64 x86_64 x86_64 GNU/Linux

virt-managerでちゃんと見えてます。

f:id:masami256:20151107233542p:plain

boxの削除ではvirt-manager側のファイルは消してくれないので自分で削除する必要があります。

masami@saga:~/codes/fedora-vagrant$ vagrant box remove fedora23
Removing box 'fedora23' (v0) with provider 'libvirt'...
Vagrant-libvirt plugin removed box only from you LOCAL ~/.vagrant/boxes directory
From libvirt storage pool you have to delete image manualy(virsh, virt-manager or by any other tool)

実践 Vagrant

実践 Vagrant

dnf: distro-syncとupgradeの違いを調べてみる

Fedora 22から公式に採用されたパッケージマネージャのdnfで、distro-syncとupgradeは何が違うのかというのを調べてみました。

まずはお約束通りにmanから。

distro-syncの説明。

   Distro-sync command
       dnf distro-sync [<package-spec>...]
              As necessary upgrades, downgrades or keeps selected installed packages to match the latest version available from any enabled repository. If no package is given, all installed packages are con‐
              sidered.

              See also Configuration Files Replacement Policy.

upgradeの説明。

   Upgrade Command
       dnf [options] upgrade
              Updates each package to a highest version that is both available and resolvable.

       dnf [options] upgrade <package-specs>...
              Updates each specified package to the latest available version. Updates dependencies as necessary.

       See also Configuration Files Replacement Policy.

updateコマンドもありますが、これはupgradeへのaliasとのことです。

これを見ると両者の違いは大体わかりますね。distro-syncの方は必要ならdowngradeもするんだけど、upgradeはバージョンが一番新しいものへの更新のみという感じですね。

ちょっとこれだけだとなんなので、ついでにソースも見てます。 まずはdistro-syncの方から。これはdnf/cli/commands/distrosync.pyにあります。ディレクトリを見るとdnfのinstall、upgrade等のコマンドはdnf/cli/commands/にありますね。

このファイルでdistro-syncの実行をするのはこのrun()で、実際の処理は別のところで行っています。extcmdsはdistro-syncコマンドに対するオプションが渡された場合に使われるのでdnf distro-syncとやった場合はextcmdsはNoneになっていると思います。

    def run(self, extcmds):
        return self.base.distro_sync_userlist(extcmds)

run()で呼んでいるdistro_sync_userlist()はdnf/cli/cli.pyにあります。

    def distro_sync_userlist(self, userlist):
        """ Upgrade or downgrade packages to match the latest versions available
            in the enabled repositories.
            :return: (exit_code, [ errors ])
            exit_code is::
                0 = we're done, exit
                1 = we've errored, exit with error string
                2 = we've got work yet to do, onto the next stage
        """
        oldcount = self._goal.req_length()
        if len(userlist) == 0:
            self.distro_sync()
        else:
            for pkg_spec in userlist:
                self.distro_sync(pkg_spec)

        cnt = self._goal.req_length() - oldcount
        if cnt <= 0 and not self._goal.req_has_distupgrade_all():
            msg = _('No packages marked for distribution synchronization.')
            raise dnf.exceptions.Error(msg)

distro-syncコマンドにオプションを渡さなかった場合はuserlistのサイズは0なので、self.distro_sync()が呼ばれます。ちなみにselfはBaseCliクラスです。

distro_sync()はBaseクラスのdnf/base.pyにあります。

    def distro_sync(self, pkg_spec=None):
        if pkg_spec is None:
            self._goal.distupgrade_all()
        else:
            sltrs = dnf.subject.Subject(pkg_spec).get_best_selectors(self.sack)
            match = reduce(lambda x, y: y.matches() or x, sltrs, [])
            if not match:
                logger.info(_('No package %s installed.'), pkg_spec)
                return 0
            for sltr in sltrs:
                if not sltr.matches():
                    continue
                self._goal.distupgrade(select=sltr)
        return 1

pkg_specはdistrosync.py.pyでのextcmdsなので、オプションを渡していなければself._goal.distupgrade_all()を呼びます。

ここで、distupgrade_all()ですが、これはdnfのソースツリーにはいません。hawkeyという別のライブラリにあります。dnfもhawkeyもrpm-software-managementの配下にあるので役割の違いというとこでしょうね。で、distupgrade_all()ですが、src/python/goal-py.cにあります。ここからはcのコードです。

static PyObject *
distupgrade_all(_GoalObject *self, PyObject *unused)
{
    int ret = hy_goal_distupgrade_all(self->goal);
    return op_ret2exc(ret);
}

メインはhy_goal_distupgrade_all()っぽいですね。探してみるとsrc/goal.c にあります。

int
hy_goal_distupgrade_all(HyGoal goal)
{
    goal->actions |= HY_DISTUPGRADE_ALL;
    queue_push2(&goal->staging, SOLVER_DISTUPGRADE|SOLVER_SOLVABLE_ALL, 0);
    return 0;
}

queue_push2はlibsolvというライブラリの関数みたいですね。このlibsolvはREADMEファイルで「This is libsolv, a free package dependency solver using a satisfiability algorithm.」と書かれています。サポートしているパッケージフォーマットはrpmdebなどがあるようです。 ということなので、dnfはパッケージの依存関係に関しては自前で処理をするのではなくて、外部のライブラリ(libsolv)を使っているということがわかりました。

ここで、なんとなく想像はついていますが、upgradeの方も見てみましょう。

upgradeコマンドの入り口はdnf/cli/commands/upgrade.pyで、distro-syncと同様にdnf/cli/commands以下にあります。

    def run(self, extcmds):
        pkg_specs, filenames = self.parse_extcmds(extcmds)

        if not pkg_specs and not filenames:
            # Update all packages.
            self.base.upgrade_all()
            done = True
        else:
            # Update files.
            local_pkgs = map(self.base.add_remote_rpm, filenames)
            results = map(self.base.package_upgrade, local_pkgs)
            done = functools.reduce(operator.or_, results, False)

            # Update packages.
            for pkg_spec in pkg_specs:
                try:
                    self.base.upgrade(pkg_spec)
                except dnf.exceptions.MarkingError:
                    logger.info(_('No match for argument: %s'), pkg_spec)
                else:

処理はこんな感じです。これもオプションでパッケージの指定をできますが、なければupgrade_all()を呼びます。upgrade_all()はdnf/base.pyにあります。

    def upgrade_all(self, reponame=None):
        # :api
        if reponame is None:
            self._goal.upgrade_all()
        else:
            try:
                self.upgrade('*', reponame)
            except dnf.exceptions.MarkingError:
                pass
        return 1

まあ、動作はdistro-syncと同じですね。upgrade_all()はhawkeyのsrc/python/goal-py.cにあります。

static PyObject *
upgrade_all(_GoalObject *self, PyObject *unused)
{
    int ret = hy_goal_upgrade_all(self->goal);
    return op_ret2exc(ret);
}

これもdistro-syncの場合と全く一緒です。hy_goal_upgrade_all()はsrc/goal.cにあります。

int
hy_goal_upgrade_all(HyGoal goal)
{
    goal->actions |= HY_UPGRADE_ALL;
    queue_push2(&goal->staging, SOLVER_UPDATE|SOLVER_SOLVABLE_ALL, 0);
    return 0;
}

この辺まででdistro-sync、upgradeがlibsolvを使って処理するというところまでわかりましたが、ここから先はデバッガでも動かしつつちゃんと動作を追わないと流れが見えないので今日はここまで/(^o^)\

φ(.. )メモシテオコウ eclipse + MALLOC_CHECK_=3でハマったという話

Androidのアプリ開発というのをやってみようと思ってgoogleのサイトからeclipse付きのSDKをダウンロードしてきて動かしたんですが、パッケージエクスプローラのプロジェクト名にある[+]をクリックして展開しようとするとeclipseがこんなエラー*** Error in `/usr/bin/java': free(): invalid pointer: 0x00000000017957d0 ***で全く使えなかったんですが、MALLOC_CHECK_の設定でabortしないようにしたら上手くいきました( ´ー`)フゥー...

普段は.bashrcでMALLOC_CHECK_を3にしてます。

masami@saga:~/Android-dev/eclipse$ echo $MALLOC_CHECK_
3

そして、この環境でeclipseを起動するとabortします/(^o^)\

masami@saga:~/Android-dev/eclipse$ ./eclipse
*** Error in `/usr/bin/java': free(): invalid pointer: 0x00000000017957d0 ***
======= Backtrace: =========
/lib64/libc.so.6[0x3d79075d9f]
/lib64/libc.so.6[0x3d7907da86]
/usr/java/jre1.7.0_45/lib/amd64/server/libjvm.so(+0x80c4d9)[0x7f60bad234d9]
/usr/java/jre1.7.0_45/lib/amd64/server/libjvm.so(+0x6316e3)[0x7f60bab486e3]
/home/masami/Android-dev/eclipse/configuration/org.eclipse.osgi/bundles/226/1/.cp/libswt-pi-gtk-4236.so(Java_org_eclipse_swt_internal_gtk_OS__1g_1data_1input_1stream_1read_1line+0xe7)[0x7f60a928d64d]
[0x7f60b6baecd8]
======= Memory map: ========
00400000-00401000 r-xp 00000000 08:02 538473829                          /usr/java/jre1.7.0_45/bin/java
~中略~
3d7e000000-3d7e011000 r-xp 00000000 08:02 1074721773                     /usr/lib64/libXext.so.6.4.0

MALLOC_CHECK_を1にしてレポートだけにすると動きますが、[+]をクリックて展開するとError in `/usr/bin/java': free(): invalid pointer:が300個近くでます\(^o^)/

masami@saga:~/Android-dev/eclipse$ MALLOC_CHECK_=1 ./eclipse
*** Error in `/usr/bin/java': free(): invalid pointer: 0x0000000004825120 ***
~中略~
*** Error in `/usr/bin/java': free(): invalid pointer: 0x000000000226de30 ***

こういった(*** Error in `/usr/bin/java': free(): invalid pointer: 0x0000000004825120 ***)なエラーはMALLOC_CHECK_関係なくダメなのかと思ってたんですがそうでもなかったと。。。

φ(.. )メモシテオコウ Fedora20でLXCを使うめも

Fedora20でLXCを使う手順のメモです。

インストールするのはlxcパッケージとlxcで使うOS環境のテンプレートが入っているlxc-templatesパッケージです。

masami@saga:~$ sudo dnf install lxc lxc-templates

テンプレートはこのようにfedoradebianubuntu等が揃ってます。

masami@saga:~$ ls /usr/share/lxc/templates/
.  ..  lxc-alpine  lxc-busybox  lxc-debian  lxc-fedora  lxc-oracle  lxc-sshd  lxc-ubuntu

では、コンテナの作成。ここではfedora環境をfoobarという名前で作ってます。

masami@saga:~$ sudo lxc-create -n foobar -t /usr/share/lxc/templates/lxc-fedora

lxc-create: No config file specified, using the default config /etc/lxc/default.conf
Host CPE ID from /etc/os-release: cpe:/o:fedoraproject:fedora:20
Checking cache download in /var/cache/lxc/fedora/x86_64/20/rootfs ...

~中略~

  util-linux.x86_64 0:2.24-0.1.fc20            xz-libs.x86_64 0:5.1.2-6alpha.fc20         yum-metadata-parser.x86_64 0:1.1.4-9.fc20    zlib.x86_64 0:1.2.8-3.fc20

Complete!
Download complete.
Copy /var/cache/lxc/fedora/x86_64/20/rootfs to /var/lib/lxc/foobar/rootfs ...
Copying rootfs to /var/lib/lxc/foobar/rootfs ...setting root passwd to root
installing fedora-release package
warning: Failed to read auxiliary vector, /proc not mounted?
Package fedora-release-20-0.7.noarch already installed and latest version
Nothing to do
unlink: cannot unlink ‘/var/lib/lxc/foobar/rootfs/etc/systemd/system/default.target’: No such file or directory
container rootfs and config created
'/usr/share/lxc/templates/lxc-fedora' template installed
'foobar' created

lxc-createによってrootfs環境が作られますが、ここで一番重要と言えるのは[Copying rootfs to /var/lib/lxc/foobar/rootfs ...setting root passwd to root]ですね。rootのパスワードはrootです。

これで環境が作成できたのでlxc-startしてみます。

masami@saga:~$ sudo lxc-start -n foobar
systemd 208 running in system mode. (+PAM +LIBWRAP +AUDIT +SELINUX +IMA +SYSVINIT +LIBCRYPTSETUP +GCRYPT +ACL +XZ)
Detected virtualization 'lxc'.

Welcome to Fedora 20 (Heisenbug)!

Set hostname to <foobar.localdomain>.
Failed to verify GPT partition /dev/dm-1: No such file or directory
/usr/lib/systemd/system-generators/systemd-gpt-auto-generator exited with exit status 1.
[  OK  ] Reached target Remote File Systems.
[  OK  ] Listening on Delayed Shutdown Socket.
~中略~
[  OK  ] Reached target Multi-User System.

Fedora release 20 (Heisenbug)
Kernel 3.11.5-300.fc20.x86_64 on an x86_64 (console)

foobar login: root
Password: 
Last failed login: Thu Oct 17 01:47:30 UTC 2013 on console
There was 1 failed login attempt since the last successful login.

Cannot make/remove an entry for the specified session

Fedora release 20 (Heisenbug)
Kernel 3.11.5-300.fc20.x86_64 on an x86_64 (console)

えー、「Cannot make/remove an entry for the specified session」と言われてログインできません(´;ω;`)ブワッ
これはググったところfedoraのbugzillaで「Bug 966807 - Can't login to systemd lightweight container」というバグがあり、この中で暫定対処として/etc/pam.d/loginのpam_loginuidの行をコメントアウトしたとあったので試したところ上手くいきました。
コンテナのルートファイルシステムは「/var/lib/lxc/foobar/rootfs」ですので「/var/lib/lxc/foobar/rootfs/etc/pam.d/login」を修正すると以下のようになります。

masami@saga:~$ cat /var/lib/lxc/foobar/rootfs/etc/pam.d/login
#%PAM-1.0
auth [user_unknown=ignore success=ok ignore=ignore default=bad] pam_securetty.so
auth       substack     system-auth
auth       include      postlogin
account    required     pam_nologin.so
account    include      system-auth
password   include      system-auth
# pam_selinux.so close should be the first session rule
session    required     pam_selinux.so close
#session    required     pam_loginuid.so
session    optional     pam_console.so
# pam_selinux.so open should only be followed by sessions to be executed in the user context
session    required     pam_selinux.so open
session    required     pam_namespace.so
session    optional     pam_keyinit.so force revoke
session    include      system-auth
session    include      postlogin
-session   optional     pam_ck_connector.so

そうしたらlxc-stopで一旦止めて、再度lxc-startすると今度は上手くいきます(∩´∀`)∩ワーイ

masami@saga:~$ sudo lxc-start -n foobar
systemd 208 running in system mode. (+PAM +LIBWRAP +AUDIT +SELINUX +IMA +SYSVINIT +LIBCRYPTSETUP +GCRYPT +ACL +XZ)
Detected virtualization 'lxc'.

Welcome to Fedora 20 (Heisenbug)!

Set hostname to <foobar.localdomain>.
Failed to verify GPT partition /dev/dm-1: No such file or directory
/usr/lib/systemd/system-generators/systemd-gpt-auto-generator exited with exit status 1.
[  OK  ] Reached target Remote File Systems.
[  OK  ] Listening on Delayed Shutdown Socket.
[  OK  ] Listening on /dev/initctl Compatibility Named Pipe.
~中略~
[  OK  ] Reached target Multi-User System.

Fedora release 20 (Heisenbug)
Kernel 3.11.5-300.fc20.x86_64 on an x86_64 (console)

foobar login: root
Password: 
Last failed login: Thu Oct 17 01:47:30 UTC 2013 on console
There was 1 failed login attempt since the last successful login.
[root@foobar ~]# ls

selinuxで警告が出たらsealertの指示に従って直せばOKです。sealertのGUIを使うかターミナルから下記コマンドで確認できます。

# sealert -a /var/log/audit/audit.log

追記:
上記の手順は設定ファイルを使っていないのでデフォルトの設定が使われてます。

masami@saga:~$ cat /etc/lxc/default.conf
lxc.network.type = veth
lxc.network.link = virbr0
lxc.network.flags = up

これだとネットワークにつながらないので/etc/lxc/default.confを適当にコピーしてネットワーク設定を追加してからlxc-createするか、/var/lib/lxc/<コンテナ名>/configを修正すればOKです。
追加するのは下記3行で環境に合わせて適当に修正してください。

lxc.network.ipv4 = 192.168.122.1/24
lxc.network.name = eth0
lxc.network.hwaddr = 52:54:00:7e:3a:AA

lxc.network.ipv4はすでにFedoravirt-managerを使って仮想環境を使っているならvirbr0があると思いますので、それを使えば良いかと。
lxc.network.hwaddrは適当に。私は既存の仮想環境で使っているMACアドレスを適当に変えてます。

あとはコンテナのほうで/sbin/ifup eth0すればネットワークにつながるはずです。