前のコードでバグってるところを見つけたので、修正版です.
全てのソースコードはgithubにあります.
PCIのバス番号と、デバイス番号からPCIデバイスを探す関数.
static u_int32_t find_pci_data(u_int8_t bus, u_int8_t dev) { u_int32_t data; u_int32_t status; u_int32_t class; u_int32_t header; u_int32_t subsystem; int i; struct pci_configuration_register reg; bool b; // At first, check function number zero. memset(®, 0, sizeof(reg)); reg.bus_num = bus; reg.dev_num = dev; // Check all function numbers. for (i = 0; i < PCI_FUNCTION_MAX; i++) { reg.func_num = i; data = read_pci_reg00(®); if (data != 0xffffffff) { class = read_pci_class(®); header = read_pci_header_type(®); subsystem = read_pci_sub_system(®); status = read_pci_command_register(®); b = store_pci_device_to_list(bus, dev, data, i, class, header, subsystem); if (!b) { printk("kmalloc failed %s:%s at %d\n", __FILE__, __FUNCTION__, __LINE__); while (1); } // if it's not a multi function, we need to search other function. if (i == 0 && !is_multi_function(header)) return 0; } } return 0; }
read_pci_XXX()はレジスタ番号を設定して,read_pci_data()を呼び出してます.
実際の処理は,こっちがやります.
static inline u_int32_t read_pci_class(struct pci_configuration_register *reg)
{
	reg->reg_num = 0x8;

	return read_pci_data(reg);
}
引数のstruct pci_configuration_registerはこんなやつです.
// This structure represents PCI's CONFIG_ADDRESS register.
struct pci_configuration_register {
	u_int32_t enable_bit;      // 31: enable bit.
	u_int32_t reserved;        // 24-30: reserved.
	u_int32_t bus_num;         // 16-23: bus number.
	u_int32_t dev_num;         // 11-15: device number.
	u_int32_t func_num;        // 8-10: function number.
	u_int32_t reg_num;         // 2-7: regster number.
	u_int32_t bit0;            // 0-1: always 0.
};
read_pci_data()は最初にwrite_pci_config_address()を使って,CONFIG_ADDRESSに必要なデータを書き込んで,次に0xcfcから32bitのデータを読み込みます.
読み終わったら,finish_access_to_config_data()を呼んで,イネーブルビットを0に戻してあげます.
static u_int32_t read_pci_data(struct pci_configuration_register *reg)
{
	u_int32_t data;

	// Enable bit should be 1 before read PCI_DATA.
	reg->enable_bit = 1;

	// write data to CONFIG_ADDRESS.
	write_pci_config_address(reg);

	data = inl(CONFIG_DATA_1);

	finish_access_to_config_data(reg);

	return data;
}
write_pci_config_address()はCONFIG_ADDRESSに対してデータ(バス,デバイス,ファンクションとか)を書き込んで,
CONFIG_DATAを読む準備をします.
static inline void write_pci_config_address(const struct pci_configuration_register *reg)
{
	u_int32_t data = 0;

	data = (reg->enable_bit << 31) |
		(reg->reserved << 24) |
		(reg->bus_num << 16) |
		(reg->dev_num << 11) |
		(reg->func_num << 8) |
		reg->reg_num;

	outl(PCI_CONFIG_ADDRESS, data);
}
store_pci_device_to_list()は見つかったデバイスの情報を連結リストに入れてるだけです.
store_pci_device_to_list(u_int8_t bus, u_int8_t devfn,
			 u_int32_t data, u_int8_t func,
			 u_int32_t class, u_int32_t header,
			 u_int32_t subsystem)
{
	struct pci_device_list *p;

	p = kmalloc(sizeof(*p));
	if (!p)
		return false;

	p->data.bus = bus;
	p->data.devfn = devfn;
	p->data.vender = data & 0xffff;
	p->data.devid = (data >> 16) & 0xffff;
	p->data.pg_if = (class >> 8) & 0xff;
	p->data.sub_class = (class >> 16) & 0xff;
	p->data.base_class = (class >> 24) & 0xff;
	p->data.func = func;
	p->data.header_type = ((header >> 16) & 0xff) & 0x7f;
	p->data.multi = (header >> 16) >> 7;
	p->data.sub_vender = subsystem & 0xffff;
	p->data.sub_devid = (subsystem >> 16) & 0xffff;


	p->next = pci_device_head.next;
	pci_device_head.next = p;

	return true;
}
PCIデバイスは今のところ,こんな感じでまとめてます.
// Store PCI device information.
struct pci_device {
	u_int8_t bus;             // bus number.
	u_int8_t devfn;           // device number.
	u_int8_t func;            // function number.
	// 0x0
	u_int16_t vender;         // vender id.
	u_int16_t devid;          // device id.

	// 0x08
	u_int8_t revid;           // revision id.
	u_int8_t pg_if;           // program interface.
	u_int32_t sub_class;	  // sub class.
	u_int32_t base_class;     // base class.

	// 0x0c
	u_int8_t header_type;     // header type.
	u_int8_t multi;           // multi device.

	// 0x2c
	u_int16_t sub_vender;     // sub system vender id.
	u_int16_t sub_devid;      // sub system device id.
};

struct pci_device_list {
	struct pci_device data;
	struct pci_device_list *next;
};
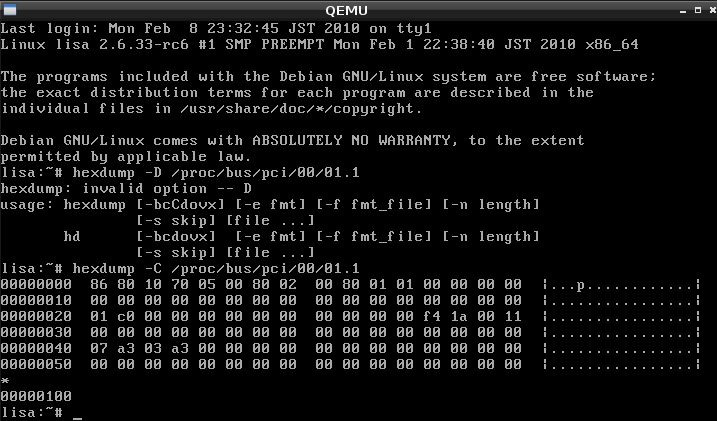
kvm上のLinuxでPCIのバス0:デバイス番号1:ファンクション番号1のデータを見たときの絵がこれです.

bochsで動かした状態がこちらです.

kvmのほうで説明すると(x86なのでリトルエンディアンです),
オフセット0の最初の2バイトがベンダーID,次の2バイトがデバイスIDになります.
ベンダーID:8086,デバイスID:7010です.
次にちょっと飛んで,8〜11バイト目がクラスコードなどです.
クラスはCONFIG_DATAのオフセット0x04のところにあって、こんな構造になってます.
| 31-24 | 23-16 | 18-8 | 7-0 |
|---|---|---|---|
| ベースクラス | サブクラス | プログラムインターフェース | リビジョン |
kvmのほうで「00 80 01 01」となってるところです.
これを上の表に当てはめると,
| 31-24 | 23-16 | 15-8 | 7-0 |
|---|---|---|---|
| ベースクラス | サブクラス | プログラムインターフェース | リビジョン |
| 01 | 01 | 80 | 0 |
こんなような感じになって,ベースクラス:0x01,サブクラス:0x01ってのがわかります.
bochsの方で見ると,「Found Device〜」の2行めが,上で説明したデバイスになってます.
あとは,CONFIG_DATAのオフセット0x0cの23bit目が1ならマルチファンクションデバイスなので,
1〜7のファンクション番号を調べるとかありますが,大体こんな感じで,PCIを利用できます.